• توجه: در صورتی که از کاربران قدیمی ایران انجمن هستید و امکان ورود به سایت را ندارید، میتوانید با آیدی altin_admin@ در تلگرام تماس حاصل نمایید.

مباحث عمومی هواشناسی

وضعیت
موضوع بسته شده است.

Amir Mohsen

متخصص بخش هواشناسی
Mashhad, Iranlatitude: 36-16N, longitude: 059-38E, elevation: 989 m
c143.gif

METAR: OIMM 121130Z 07008KT 9999 FEW030CB FEW035 SCT200 23/12 Q1016 A3000
short-TAF: out of date (646 hours)
long-TAF: OIMM 121100Z 1212/1318 12005MPS 7000 FEW035CB SCT040 BKN100 TEMPO 1215/1221 09007MPS 2000 SHRA BR FEW030 TEMPO 1314/1318 06005MPS 4000 SHRA
[h=2]Time: 16:16 (11:46 UTC)
[h=4]Current weather observation
The report was made 16 minutes ago, at 11:30 UTC
Wind 15 km/h from east/northeast
Temperature 23°C
Humidity 50%
Pressure 1016 hPa
Visibility 10 km or more
Few clouds at a height of 914 m , Cumulonimbus.
Few clouds at a height of 1067 m
Scattered clouds at a height of 6096 m


[h=4]Forecast
The report was made 43 minutes ago, at 11:03 UTC
Forecast valid from 12 at 12 UTC to 13 at 18 UTC
Wind 18 km/h from east/southeast
Visibility 7000 m
Few clouds at a height of 1067 m , Cumulonimbus.
Scattered clouds at a height of 1219 m
Broken clouds at a height of 3048 m
Temporary
from 12 at 15 UTC to 12 at 21 UTC
Wind 25 km/h from east
Visibility 2000 m
Few clouds at a height of 914 m
rain showers and mist
Temporary
from 13 at 14 UTC to 13 at 18 UTC
Wind 18 km/h from east/northeast
Visibility 4000 m
rain showers
 

Abbath

New member
درود دوستان،باز هم صبحتون بخیر به وقت خودم،هنوز صبحونه نخوردم :دی

دوستان سوالی پرسیدم صفحات قبل مبنی بر اینکه شرایط ظرفی که برای اندازه گیری بارش نیاز داریم چیه؟کلا لینکی چیزی که توضیحی هر چند کوچیک در مورد اندازه گیری اماتوری میزان بارندگی اگه تو دست و بالتون هست دریغ نکنید،بارشا فردا داره شروع میشه،حداقل فردا صبح برم مواد لازم رو تهیه کنم :دی
 

rahsazan

کاربر ويژه
درود دوستان،باز هم صبحتون بخیر به وقت خودم،هنوز صبحونه نخوردم :دی

دوستان سوالی پرسیدم صفحات قبل مبنی بر اینکه شرایط ظرفی که برای اندازه گیری بارش نیاز داریم چیه؟کلا لینکی چیزی که توضیحی هر چند کوچیک در مورد اندازه گیری اماتوری میزان بارندگی اگه تو دست و بالتون هست دریغ نکنید،بارشا فردا داره شروع میشه،حداقل فردا صبح برم مواد لازم رو تهیه کنم :دی
سلام عباس جان
قزوین چقدر با اینجا اختلاف ساعت داره:غش2:

Homemade Rain Gauge


I will be showing you how to make your own homemade rain gauge or pluviometer which will be used for measuring rainfall.

Materials needed :

- You will need any 2 liter size Soda plastic bottle.
- Scissors
- Ruler
- Waterproof marker
- Clear plastic stencil
- Large plastic container to fit your soda bottle in
- 1 screw (Optional)
- Screwdriver (Optional)

Step 1 :
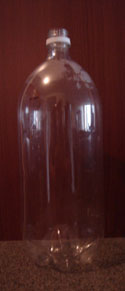
empty_soda_bottle.jpg
Take an ordinary 2 liter plastic soda bottle and make yourself a mark with a black marker all around the bottle-this will be the area you will cut.


Step 2 :
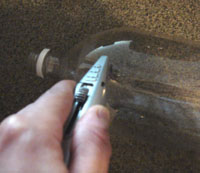
soda_bottle_knife_incision.jpg
Make a slight incision on the area to be cut, so as to make it easier when you actually cut it with the scissors.


Step 3 :
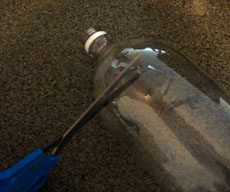
cutting-top-part.jpg
Start off by cutting the top portion of the top of the bottle, about 1/3 of the way down. The bottom part should be longer since this will be the part which will store the rain water.


Step 4 :
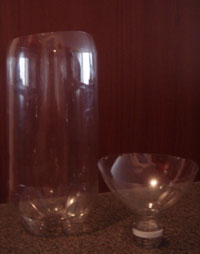
homemade_rain_guage_2parts.jpg
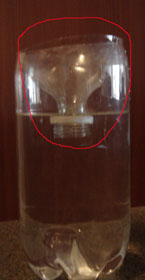
Turn the top part of the bottle you just cut in Step 1 upside down, and and place it inside the bottle. The top part will act as your funnel. This is how it looks like in the next image :


Step 5 :
homemade_rain_guage_funnel.jpg
This is how the funnel looks when placed inside the plastic bottle.


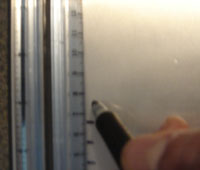
For the following step, take a ruler and a clear plastic stencil on an even surface and make sure the ruler is even with the lines you are creating. Measure out a scale in millimeters(mm) using a marker.

Step 6 :
drawing_out_stencil_measure-offical.jpg
If you are doing it in centimeters, this is fine too, but usually rain is measured in millimeters(mm).
Just remember that 1 centimeters(cm) = 10 millimeters(mm) and 1 inch(in)of rain is = 2.54cm for the conversion rate.
So for example, if you have 2 cm of fallen rain, then this would be equal to 20mm of rain.


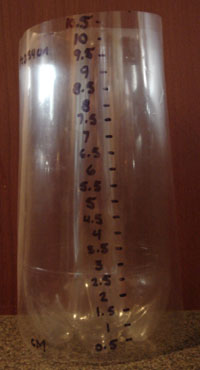
Then you can take that clear plastic stencil you created in step #6 and align it with the bottom of your container or place it inside the plastic soda bottle like in the picture below. You will use this for measuring rainfall.

Step 7 :
soda-bottle-with-transparent-measure-sheet.jpg


You might want to place your homemade rain guage in a large plastic container and either screw it down on a wooden board or in a flower pot. Either way that you choose, this will prevent it from tipping over with the wind or have some animal tip it over.

Place your homemade rain gauge in an open area. Don't place it near or under trees or near the house. Weather you choose to go with a homemade rain gauge or one that you buy, they are both good for measuring rainfall.It's always fun to make your own homemade rain gauge, but if you don't want to fiddle around,you can buy a pluviometer, that's the more technical word for a rain gauge.
It is totally up to you which one you decide to go with. I am still working on this page, I will have more pictures illustrating how to screw down your rain gauge to either a wooden board or flower pot.
cont_bot.png
 

navid-mashhad

کاربر ويژه
میری جان
یک ظرف فلزی استوانه ای پیدا کردم تهش کاملا صافه 48 میلی متر هم گودیشه ( فکر کنم زمانی ظرف سوهان بوده )
الانم می خوام مدرجش کنم به نظرت خوبه؟؟؟
 

Abbath

New member
سلام عباس جان
قزوین چقدر با اینجا اختلاف ساعت داره:غش2:

Homemade Rain Gauge


I will be showing you how to make your own homemade rain gauge or pluviometer which will be used for measuring rainfall.

Materials needed :

- You will need any 2 liter size Soda plastic bottle.
- Scissors
- Ruler
- Waterproof marker
- Clear plastic stencil
- Large plastic container to fit your soda bottle in
- 1 screw (Optional)
- Screwdriver (Optional)

Step 1 :
empty_soda_bottle.jpg
Take an ordinary 2 liter plastic soda bottle and make yourself a mark with a black marker all around the bottle-this will be the area you will cut.


Step 2 :
soda_bottle_knife_incision.jpg
Make a slight incision on the area to be cut, so as to make it easier when you actually cut it with the scissors.


Step 3 :
cutting-top-part.jpg
Start off by cutting the top portion of the top of the bottle, about 1/3 of the way down. The bottom part should be longer since this will be the part which will store the rain water.


Step 4 :
homemade_rain_guage_2parts.jpg
Turn the top part of the bottle you just cut in Step 1 upside down, and and place it inside the bottle. The top part will act as your funnel. This is how it looks like in the next image :


Step 5 :
homemade_rain_guage_funnel.jpg
This is how the funnel looks when placed inside the plastic bottle.


For the following step, take a ruler and a clear plastic stencil on an even surface and make sure the ruler is even with the lines you are creating. Measure out a scale in millimeters(mm) using a marker.

Step 6 :
drawing_out_stencil_measure-offical.jpg
If you are doing it in centimeters, this is fine too, but usually rain is measured in millimeters(mm).
Just remember that 1 centimeters(cm) = 10 millimeters(mm) and 1 inch(in)of rain is = 2.54cm for the conversion rate.
So for example, if you have 2 cm of fallen rain, then this would be equal to 20mm of rain.


Then you can take that clear plastic stencil you created in step #6 and align it with the bottom of your container or place it inside the plastic soda bottle like in the picture below. You will use this for measuring rainfall.

Step 7 :
soda-bottle-with-transparent-measure-sheet.jpg


You might want to place your homemade rain guage in a large plastic container and either screw it down on a wooden board or in a flower pot. Either way that you choose, this will prevent it from tipping over with the wind or have some animal tip it over.

Place your homemade rain gauge in an open area. Don't place it near or under trees or near the house. Weather you choose to go with a homemade rain gauge or one that you buy, they are both good for measuring rainfall.It's always fun to make your own homemade rain gauge, but if you don't want to fiddle around,you can buy a pluviometer, that's the more technical word for a rain gauge.
It is totally up to you which one you decide to go with. I am still working on this page, I will have more pictures illustrating how to screw down your rain gauge to either a wooden board or flower pot.

cont_bot.png


ساعت بدن من به هم خورده،عین جغد شبا مشغول شکارم،روزا هم خوابم :دی

بسیار ممنون محمدرضا جان،کار زیاد سختی نیست مثل اینکه،فقط دقت اندازه گیریش مثل اینکه کمه
 

rahsazan

کاربر ويژه
images
Z
imagehandler.ashx


How to Build a Rain GaugeEdited by Steve Barker, Krystle, Maluniu, Nicole Willson and 18 others


If you'd like to keep track of how much rainfall you're getting, you can buy a rain gauge, or you can make one out of inexpensive items from your local hardware store. These instructions discuss how to put one together and calculate exactly how much rain has fallen. It's not only easier on the wallet, but it's also a great science project and learning experience for kids.


[h=2]EditSteps
  • 1
    Assemble the gauge by putting the funnel securely onto a container that's large enough to collect the amount of rain you would normally get in your area without overflowing.


  • 2
    Work out the surface area of the funnel that you will be using.


    • Measure the widest inside diameter of the funnel in cm, divide that by 2 (to get the radius).
    • Square that number (multiply it by itself) then multiply by 3.142 to get the area of the top of the funnel.
    • Multiply (cm) by 10 (to get mm). This gives you the number to divide by when you are working out how much rain has fallen in millimetres. (Ex: If the area of the funnel (step 2) is 7.855cm (10 cm diameter) and your container filled with 50 ml of rain, then you divide 50 by 7.855 to get 6.365mm of rain. (50/7.855=6.365))
  • 3
    Using a measuring jug or any other container calibrated in millilitres (ml) measure the amount of rainwater you have collected then divide that number by the number you came up with in step 2. This gives you the amount of rain in millimetres that has fallen.


  • 4
    Finished.


rahsazan

کاربر ويژه
میری جان
یک ظرف فلزی استوانه ای پیدا کردم تهش کاملا صافه 48 میلی متر هم گودیشه ( فکر کنم زمانی ظرف سوهان بوده )
الانم می خوام مدرجش کنم به نظرت خوبه؟؟؟
آره خوبه، فقط وقتی که میزان بارش رو میخونی سعی کن که دیدت نسبت به خط کش عمود باشه چون خودت بهتر میدونی که اگه از بالا نگاه کنی کمتر نشون میده و بعد امیرمحسن باهامون برخورد میکنه:خنده1:
مراقب باش بمرور زمان زنگ نزنه
 
آخرین ویرایش:

navid-mashhad

کاربر ويژه
ولی مدرجش نکردم چون سخته
میلی متر خیلی مقیاسه کوچیکیه
در واقع ما نمی تونیم بارشو به دهم میلی متر بگیم مثلا بگیم 1.3 میلی متر باید رندش کنیم
 

rahsazan

کاربر ويژه
ولی مدرجش نکردم چون سخته
میلی متر خیلی مقیاسه کوچیکیه
در واقع ما نمی تونیم بارشو به دهم میلی متر بگیم مثلا بگیم 1.3 میلی متر باید رندش کنیم
چرا حتی به صدم میلیمتر هم میتونیم!
روشش هم اینه که مساحت سطحی که بارون رو جمع میکنه 10 برابر سطح ظرفی باشه که بارون توش جمه میشه، اون وقت هر یک سانتیمتر بارون جمع شده در ظرف معادل یک میلیمتر بارش واقعی میشه و چون درجه بندی ظرف به میلیمتر هست، دهم میلیمتر هم معلوم میشه
حالا اگه سطح ظرف و سطح باران گیر نسبت 100/1 داشته باشه میشه به صدم هم اندازه گیری کرد که البته این کار انجام نمیشه
من یه کتاب هیدرولوژی مهندسی دارم اینارو توضیح داده پیداش کنم خیلی خوب میشهبیشتر در این مورد اطلاعات داره
 

navid-mashhad

کاربر ويژه
چرا حتی به صدم میلیمتر هم میتونیم!
روشش هم اینه که مساحت سطحی که بارون رو جمع میکنه 10 برابر سطح ظرفی باشه که بارون توش جمه میشه، اون وقت هر یک سانتیمتر بارون جمع شده در ظرف معادل یک میلیمتر بارش واقعی میشه و چون درجه بندی ظرف به میلیمتر هست، دهم میلیمتر هم معلوم میشه
حالا اگه سطح ظرف و سطح باران گیر نسبت 100/1 داشته باشه میشه به صدم هم اندازه گیری کرد که البته این کار انجام نمیشه
من یه کتاب هیدرولوژی مهندسی دارم اینارو توضیح داده پیداش کنم خیلی خوب میشهبیشتر در این مورد اطلاعات داره

من فقط یه ظرف گزاشتم یعنی قیف نداره فقط مقدار بارشو میتونم کلی بگم
 

rahsazan

کاربر ويژه
من فقط یه ظرف گزاشتم یعنی قیف نداره فقط مقدار بارشو میتونم کلی بگم
فکر کنم قیف واسه اینه که تبخیر کم بشه و از طرفی وقتی که ظرف جمع کننده نسبت به سطح کوچکتر باشه(برا اندازه گیری به دهم میلیمتر) استفاده میشه
فکر کنم استاد هیدرولوژیمون میگفت گاهی اوقات یکم روغن ته بارونسنج میریزن (اگه بعد از یه مدت برن برای برداشت اطلاعات)، روغن روی آب رو گرفته و آب بارون تبخیر نمیشه
 

arak

New member
نمیدونم از دیروز چی شده که قسمت سمت راست صفحات ایران انجمن ناقص باز میشه،نه آواتارا معلومه نه اون قسمتی که مثلا نوشته کاربر ویژه،کسی می تونه ما رو راهنمایی کنه؟:گل:
 
وضعیت
موضوع بسته شده است.
بالا